Optical Character Recongnition Web App Project Fall 2022
Why This Project Was Started
This project was interesting due to many factors. Not just because it was a project for the Web App Development class. But because of the source of the project idea. As a part of my College’s Computer Science Department seniors are to take part in a two semester long Senior Design Capstone Project as a part of a team of students. With the projects being gathered from local industry and companies who will sponsor them. But due to several factors there are always a few projects that are not selected by a team.
As a result there are sometimes some interesting ideas or projects that are never developed on that year. And when we started brainstorming for projects for Web App Development we looked through the list of Capstone projects that were not claimed. And found this project that we felt that we could develop to an acceptable level for this class in a single semester even if it might not be “capstone level.” So we talked to the professor in charge of both Web App and Capstone to see if we could do this project not as a Capstone, but for Web App Development. And luckily enough they allowed it. So we contacted the sponsor of the project and away we went.
Project Explanation, Goals, and Requirements
This project as the sponsor originally listed had the general requirement being to develop a system that processes handwritten text from a “commitment card.” With that text containing the names and addresses of those who filled out the card. And while the original project had more requirements this is the general idea that we used for this project. Which we added on to in order to meet the requirements for our Web App Development class.
In general this project had the following goals.
- Create a usable interface.
- Process a PDF that contains multiple cards and/or a image that contains a single card.
- Save the results to a MongoDB database.
With the MongoDB database being a part of the requirements for our Web App Development class. Another requirement being that it would be hosted so that it would be publicly available during our final presentation. Though the overall design of our project was intended to be only hosted and used internally.
Three Major Parts
Development of the Web App could be divided into three main parts. Those being the interface, the card processing, and the database integration.
Interface
The interface which was mostly done by cjb574 and aaron-h-rich was build using React.js and was styled using Bootstrap along with some customized CSS. Examples of which can be seen in the images below.
Interface Example
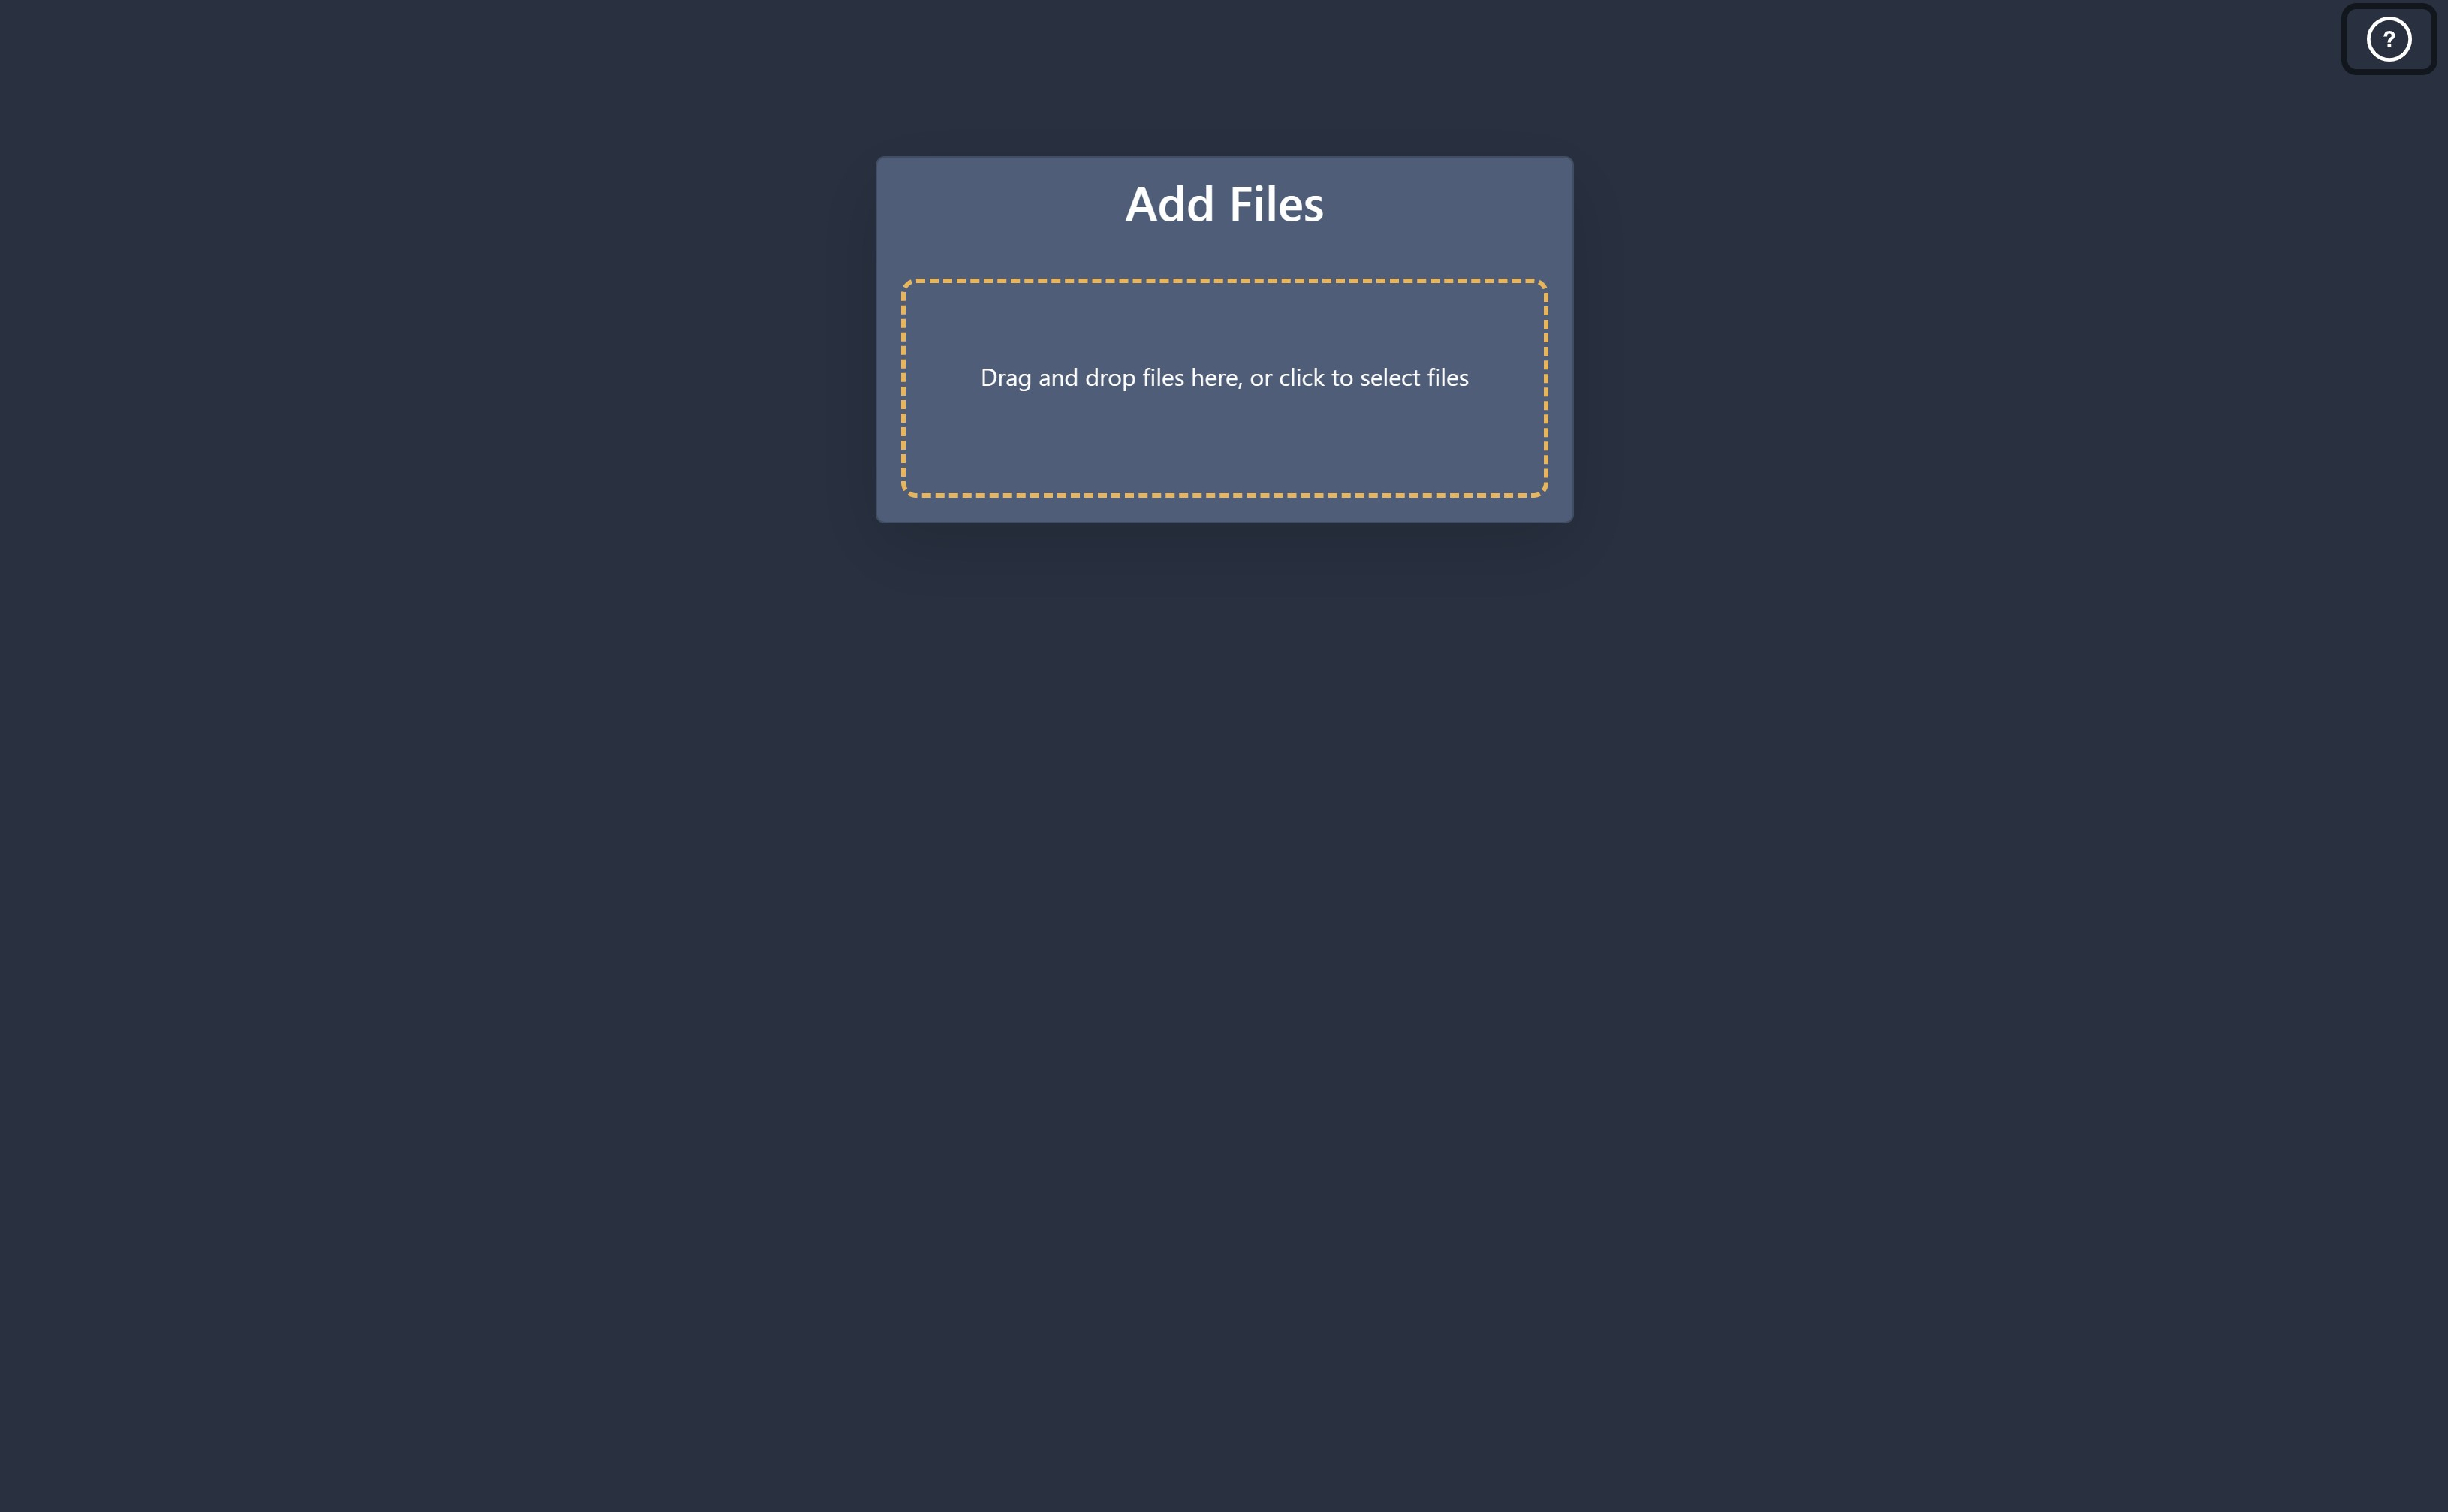
Main Page
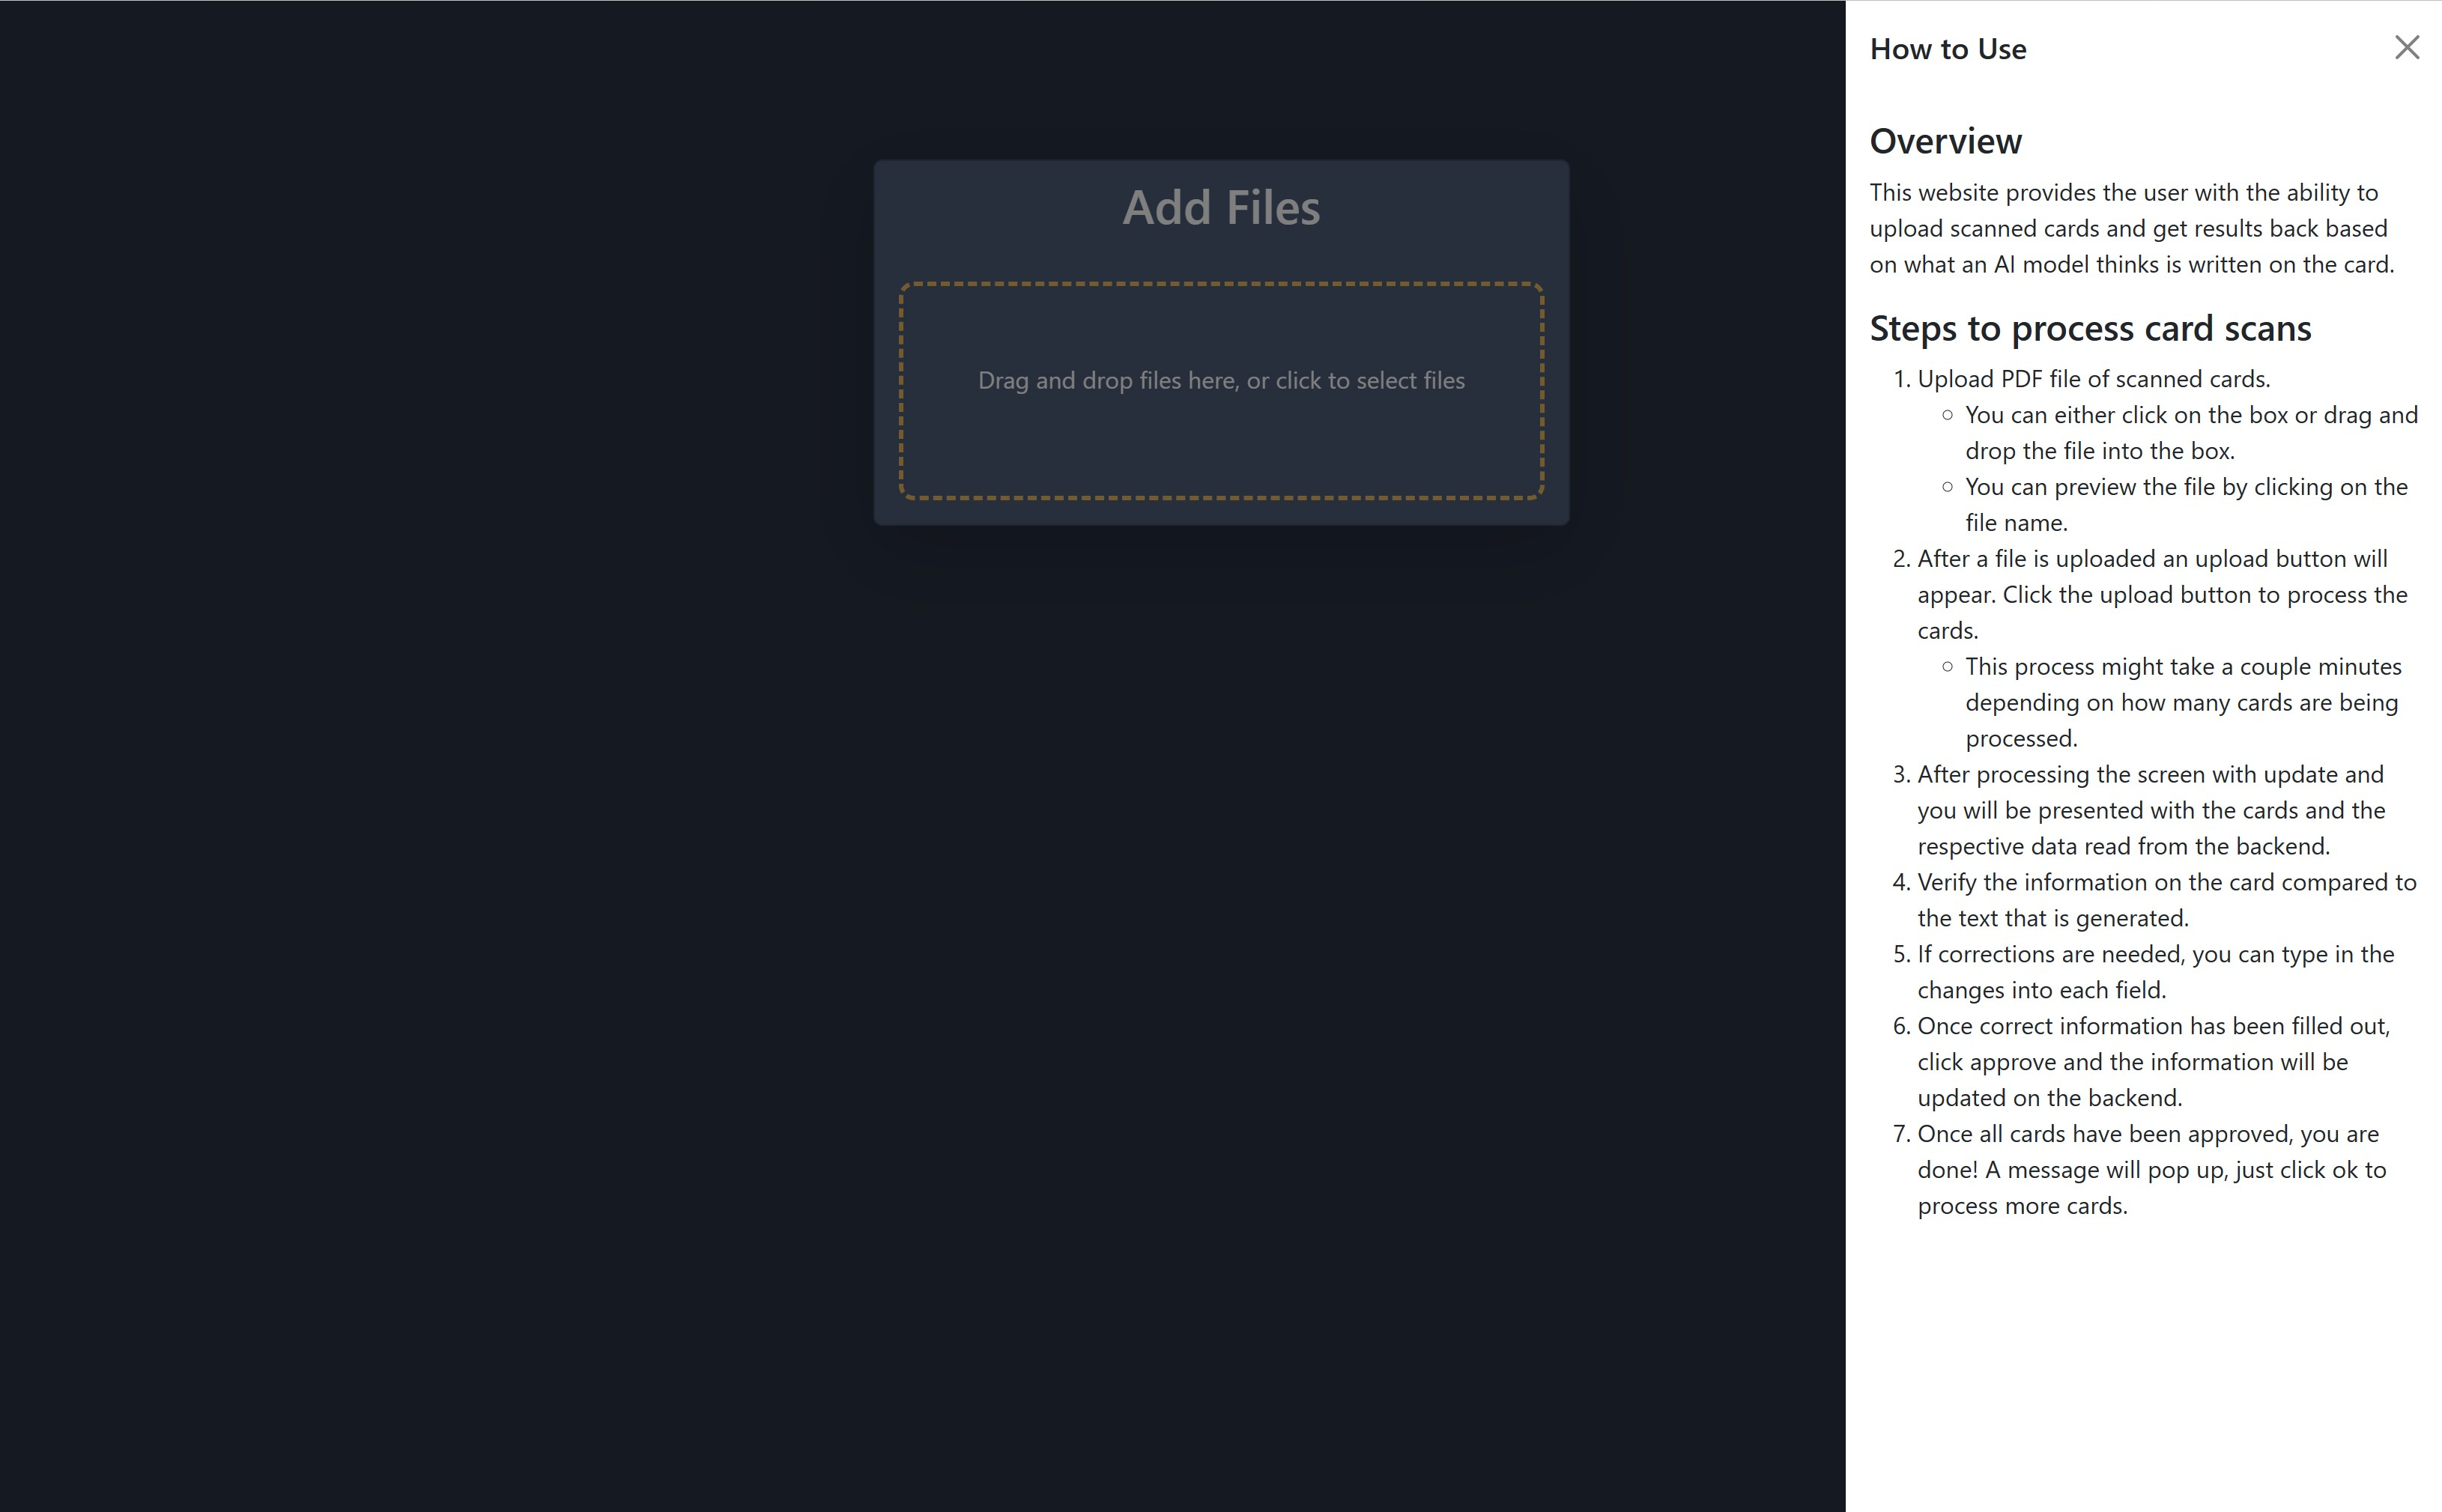
Help Window accessible on Main Page
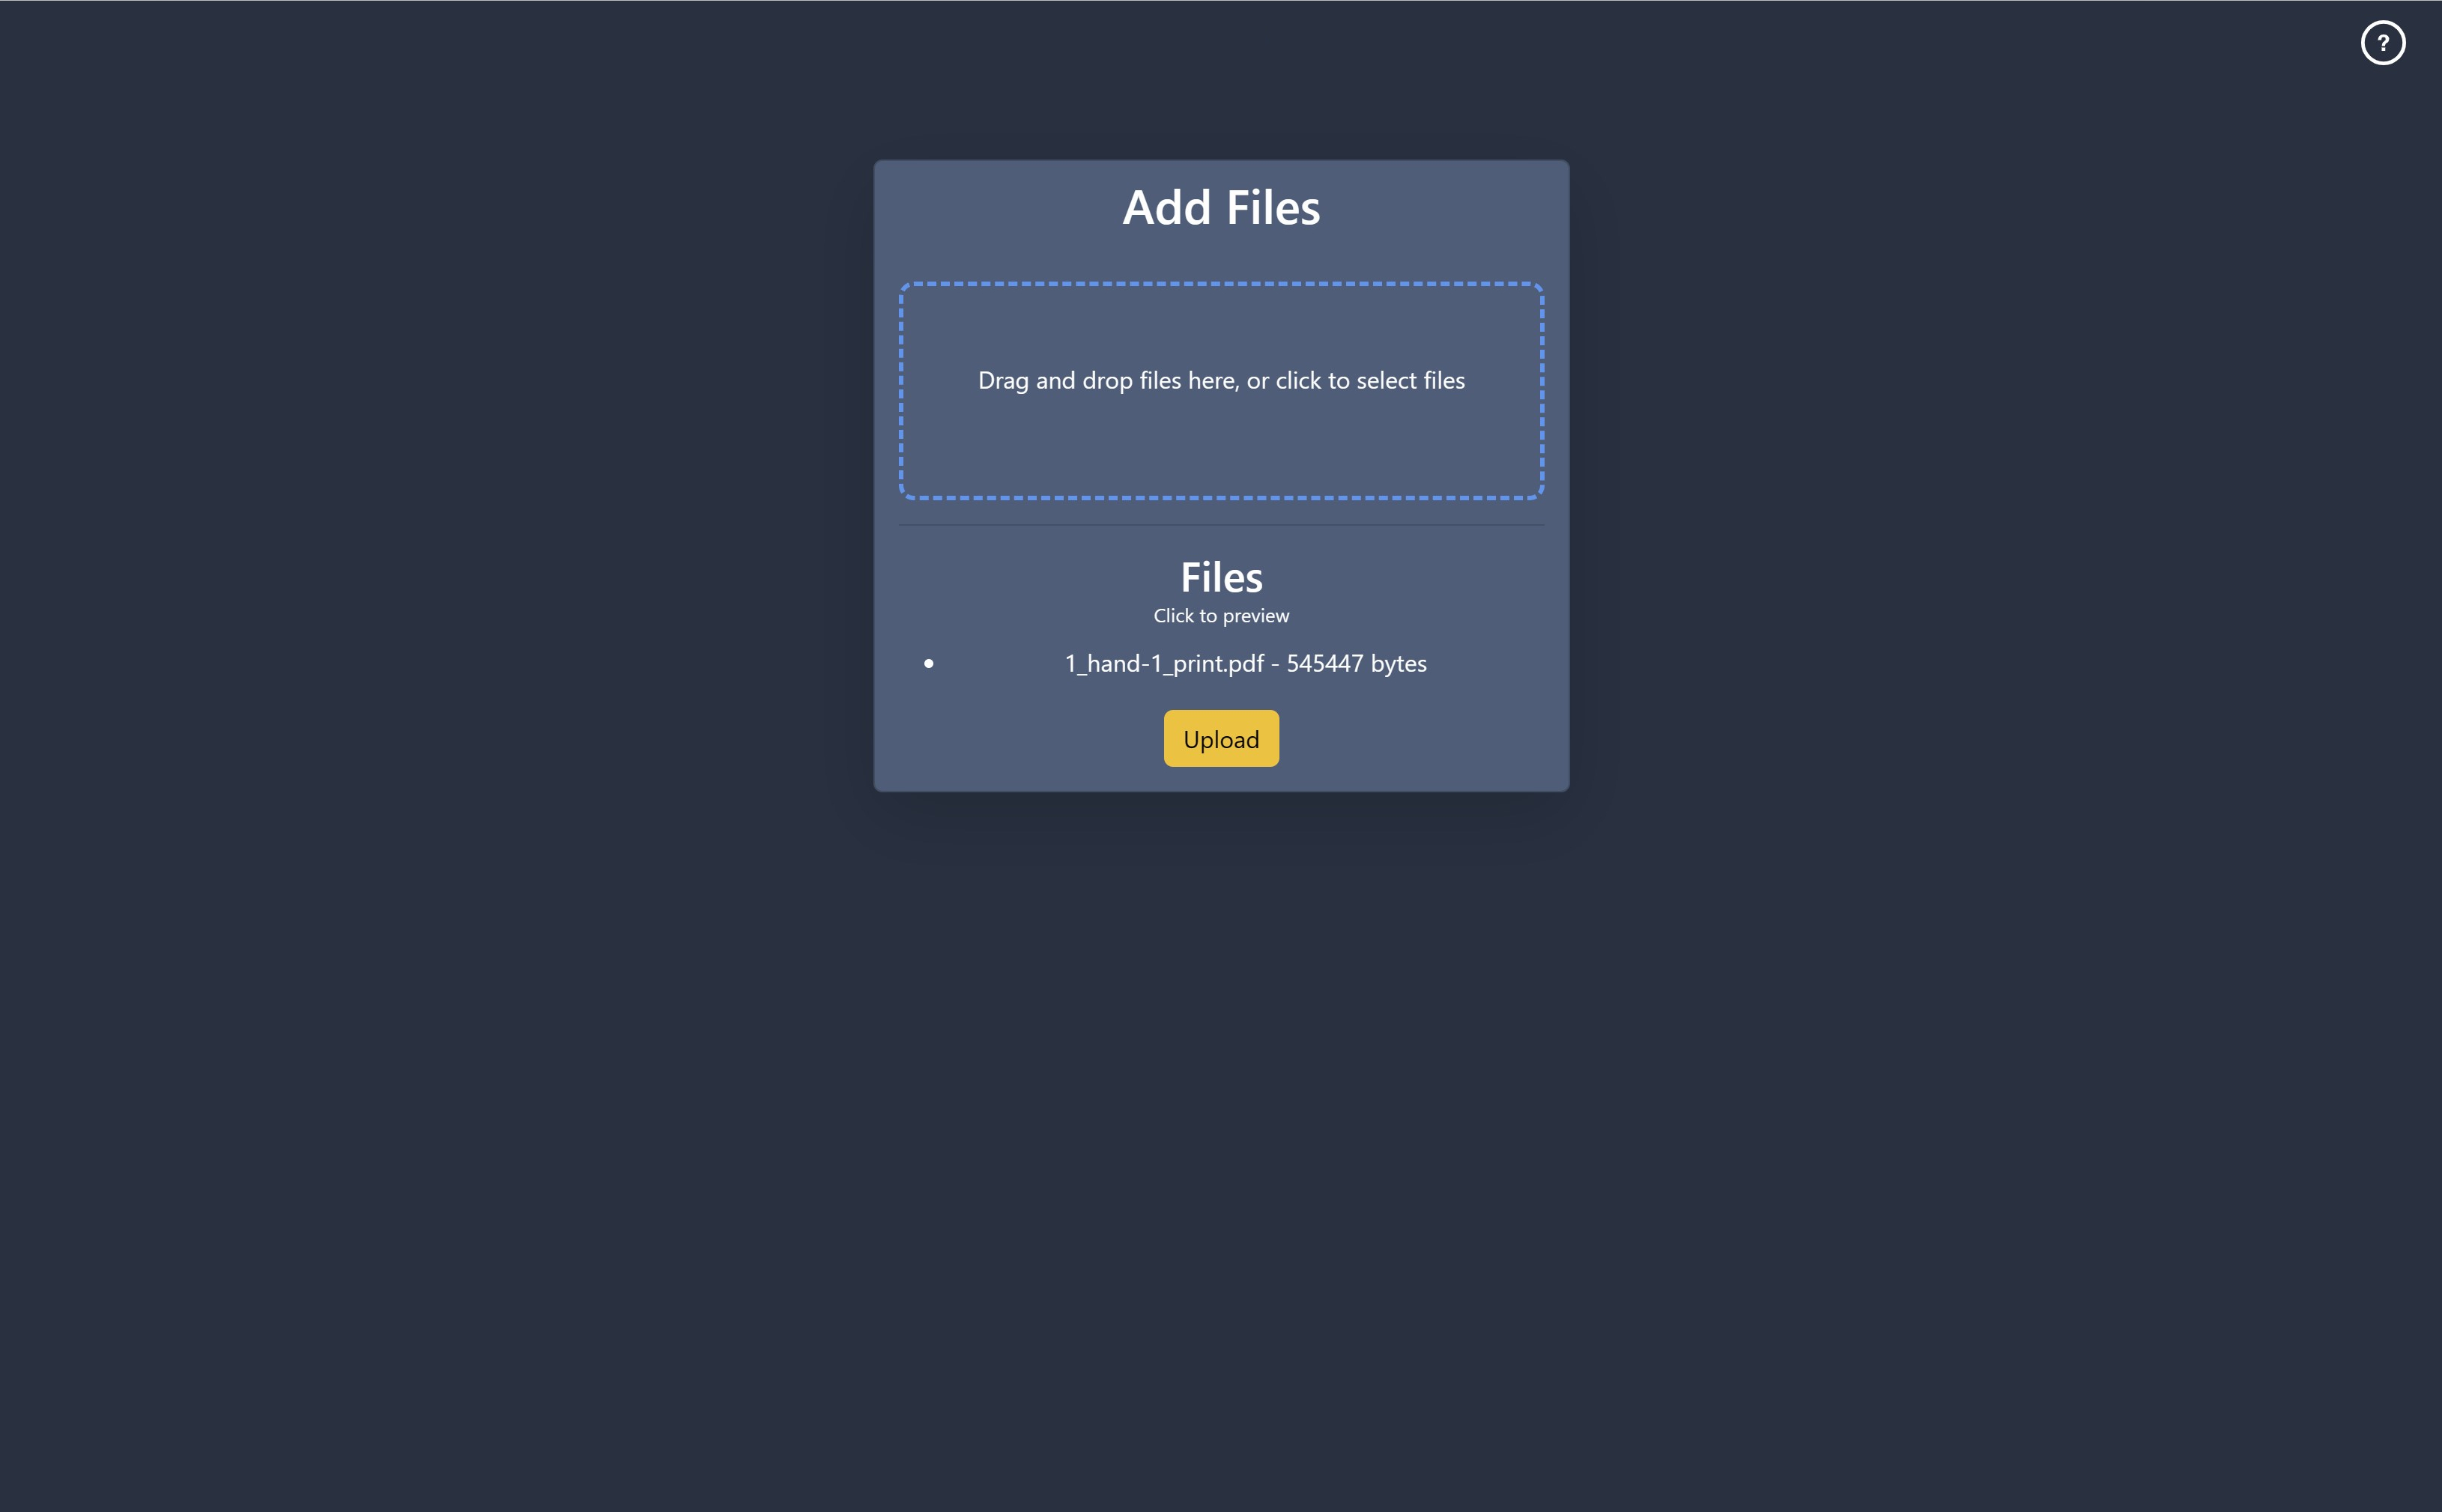
Item Selected for Upload
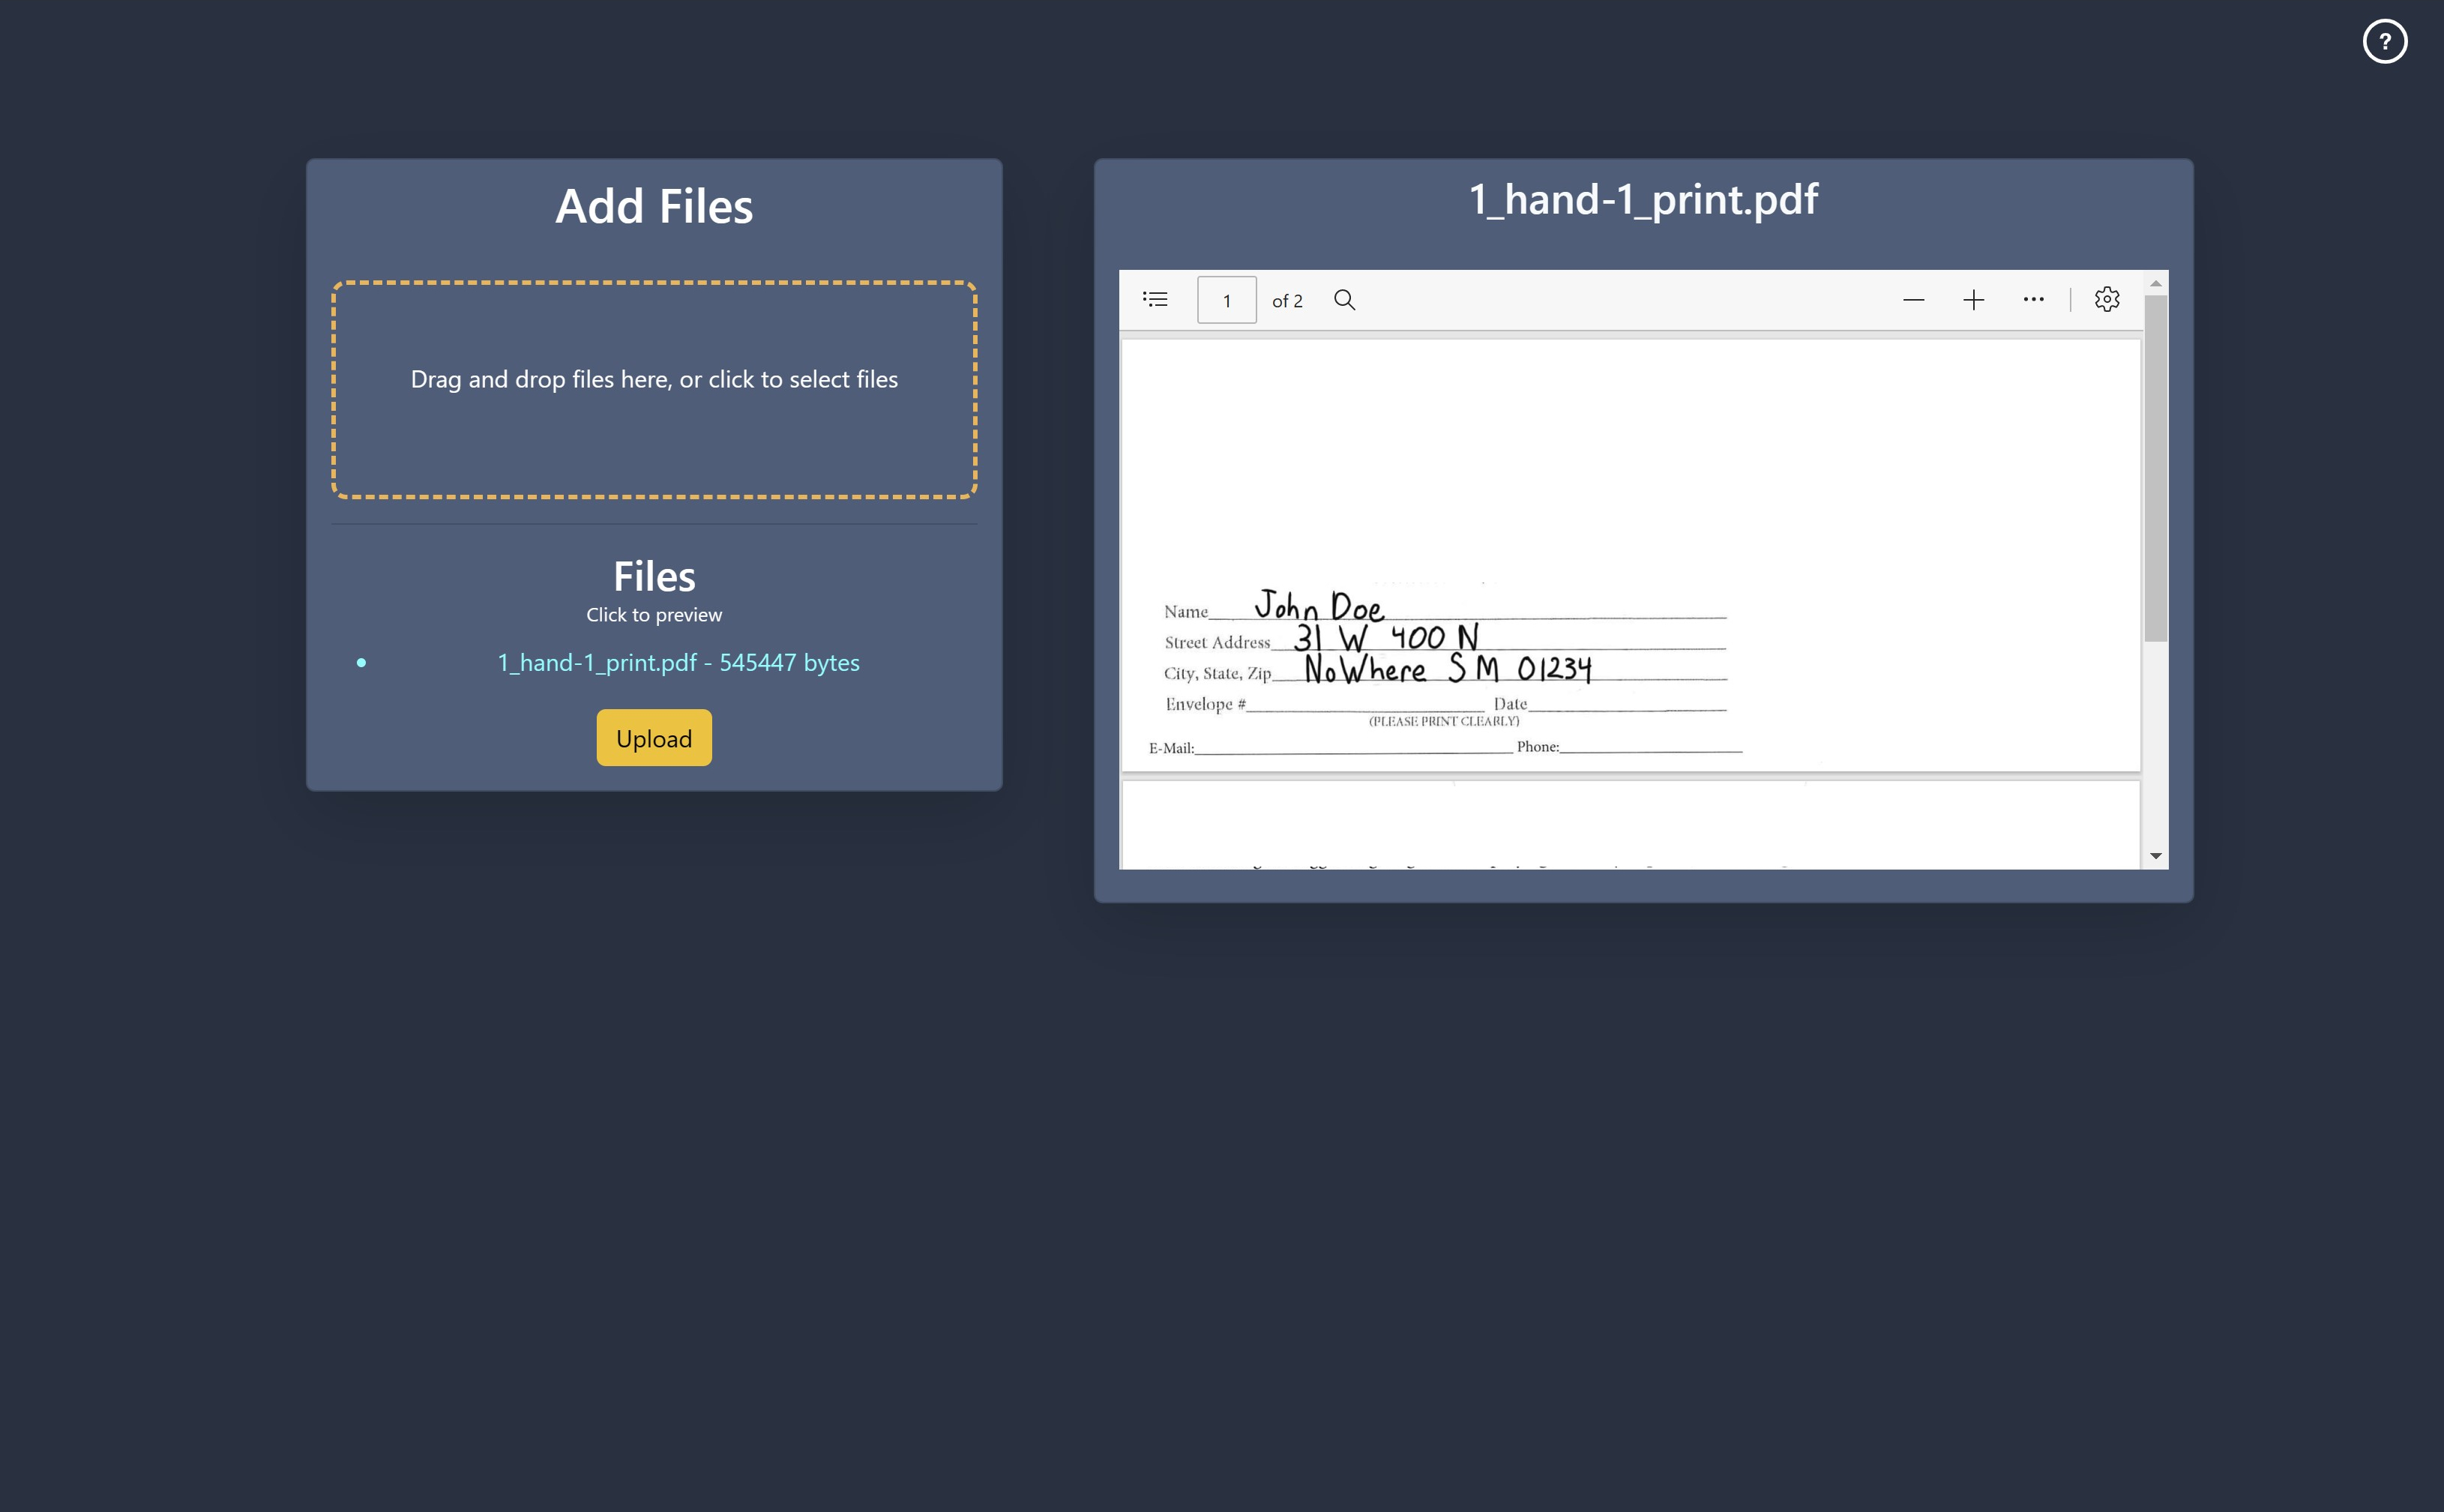
Upload Item Preview
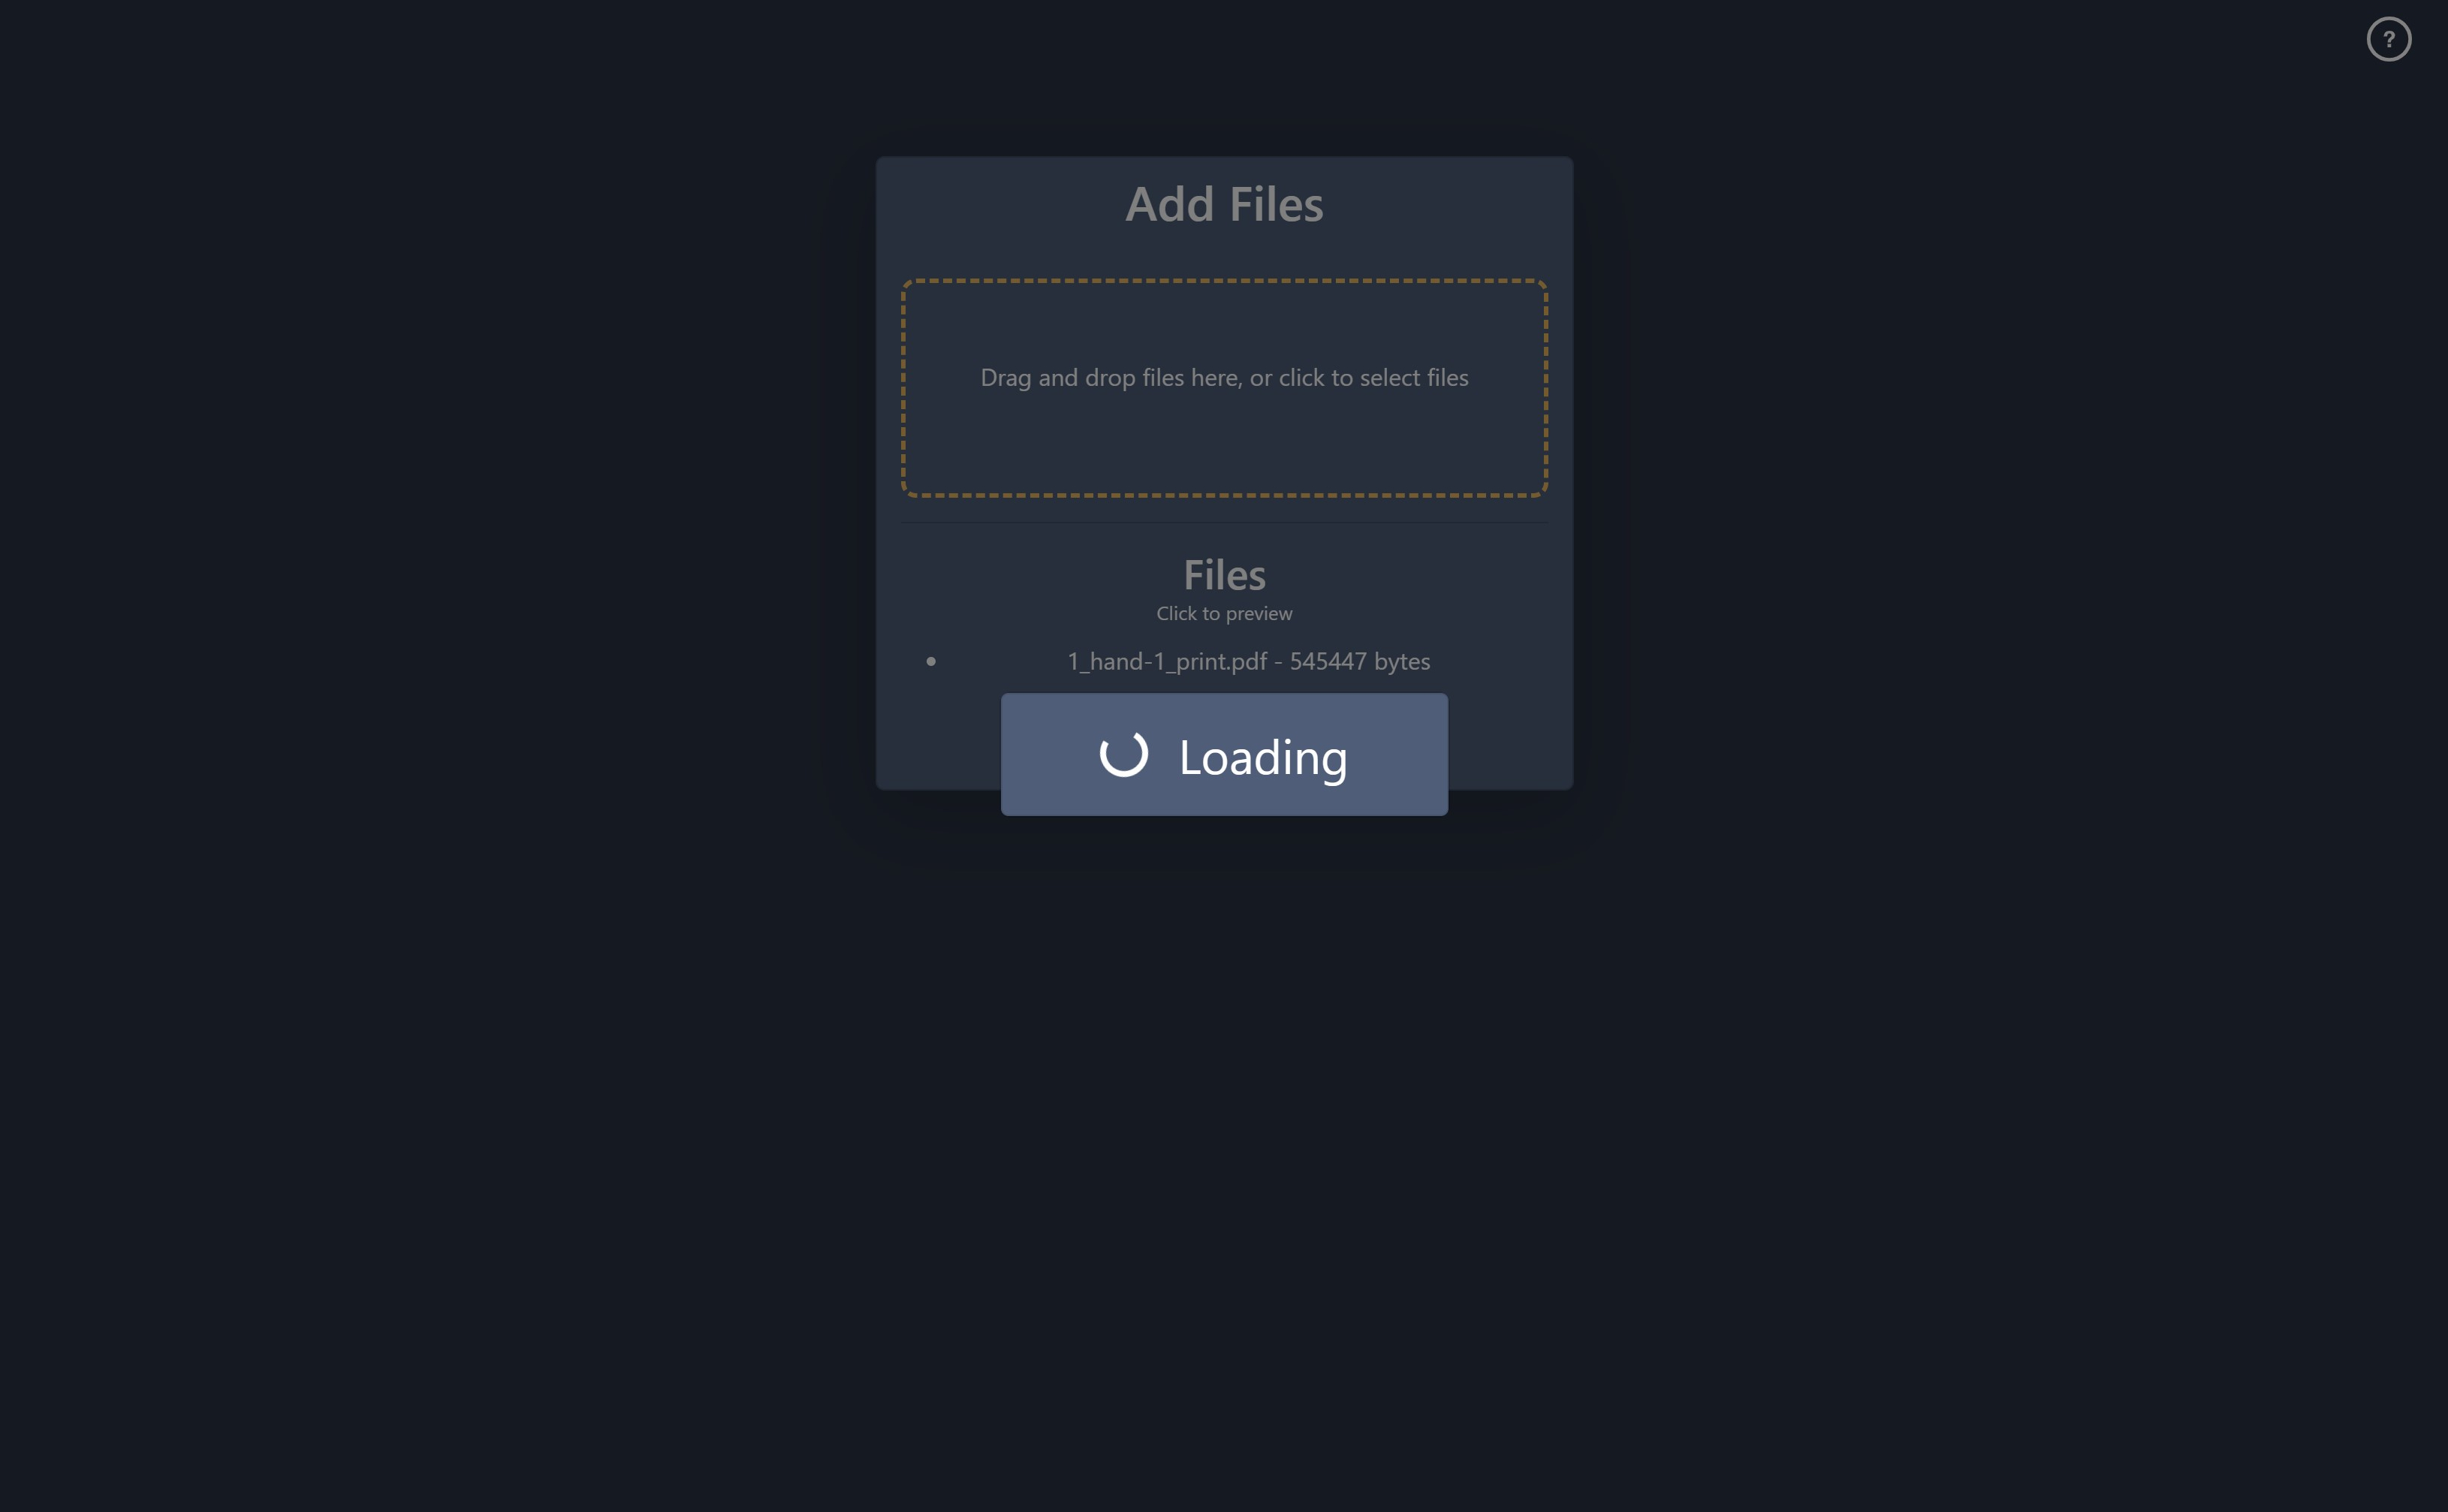
Loading/Processing Screen
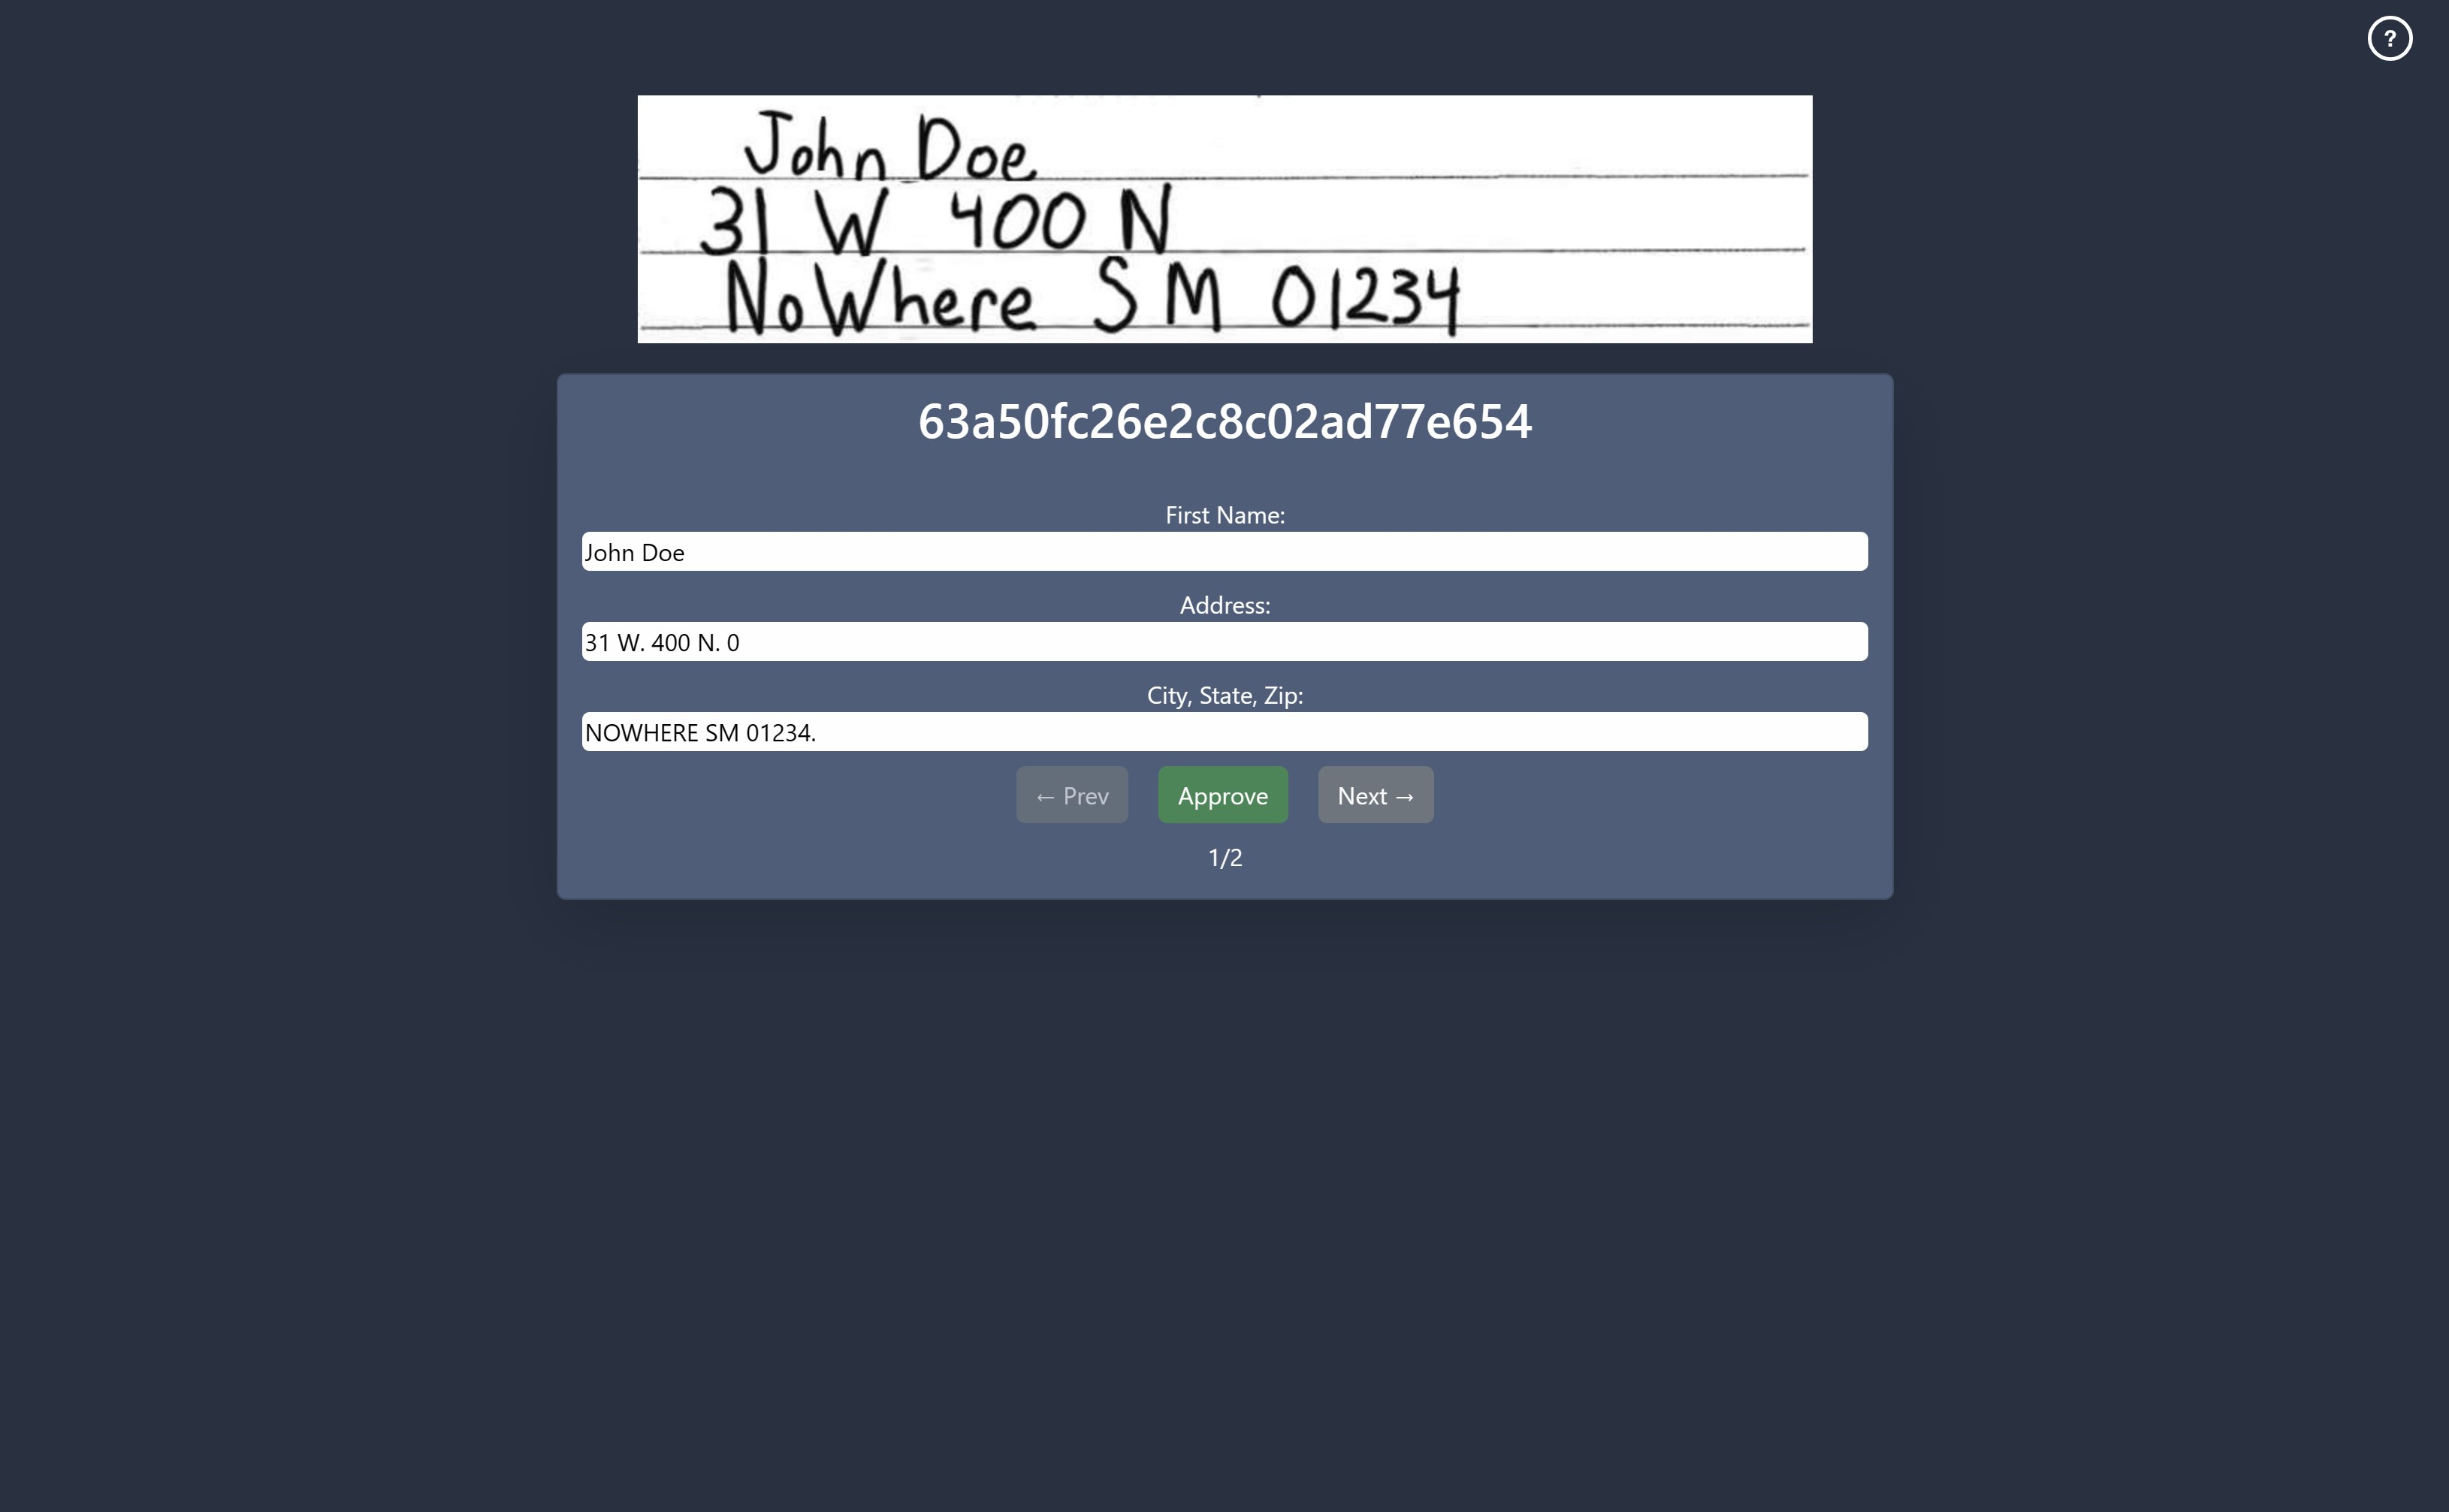
Approval Page for Handwritten Card
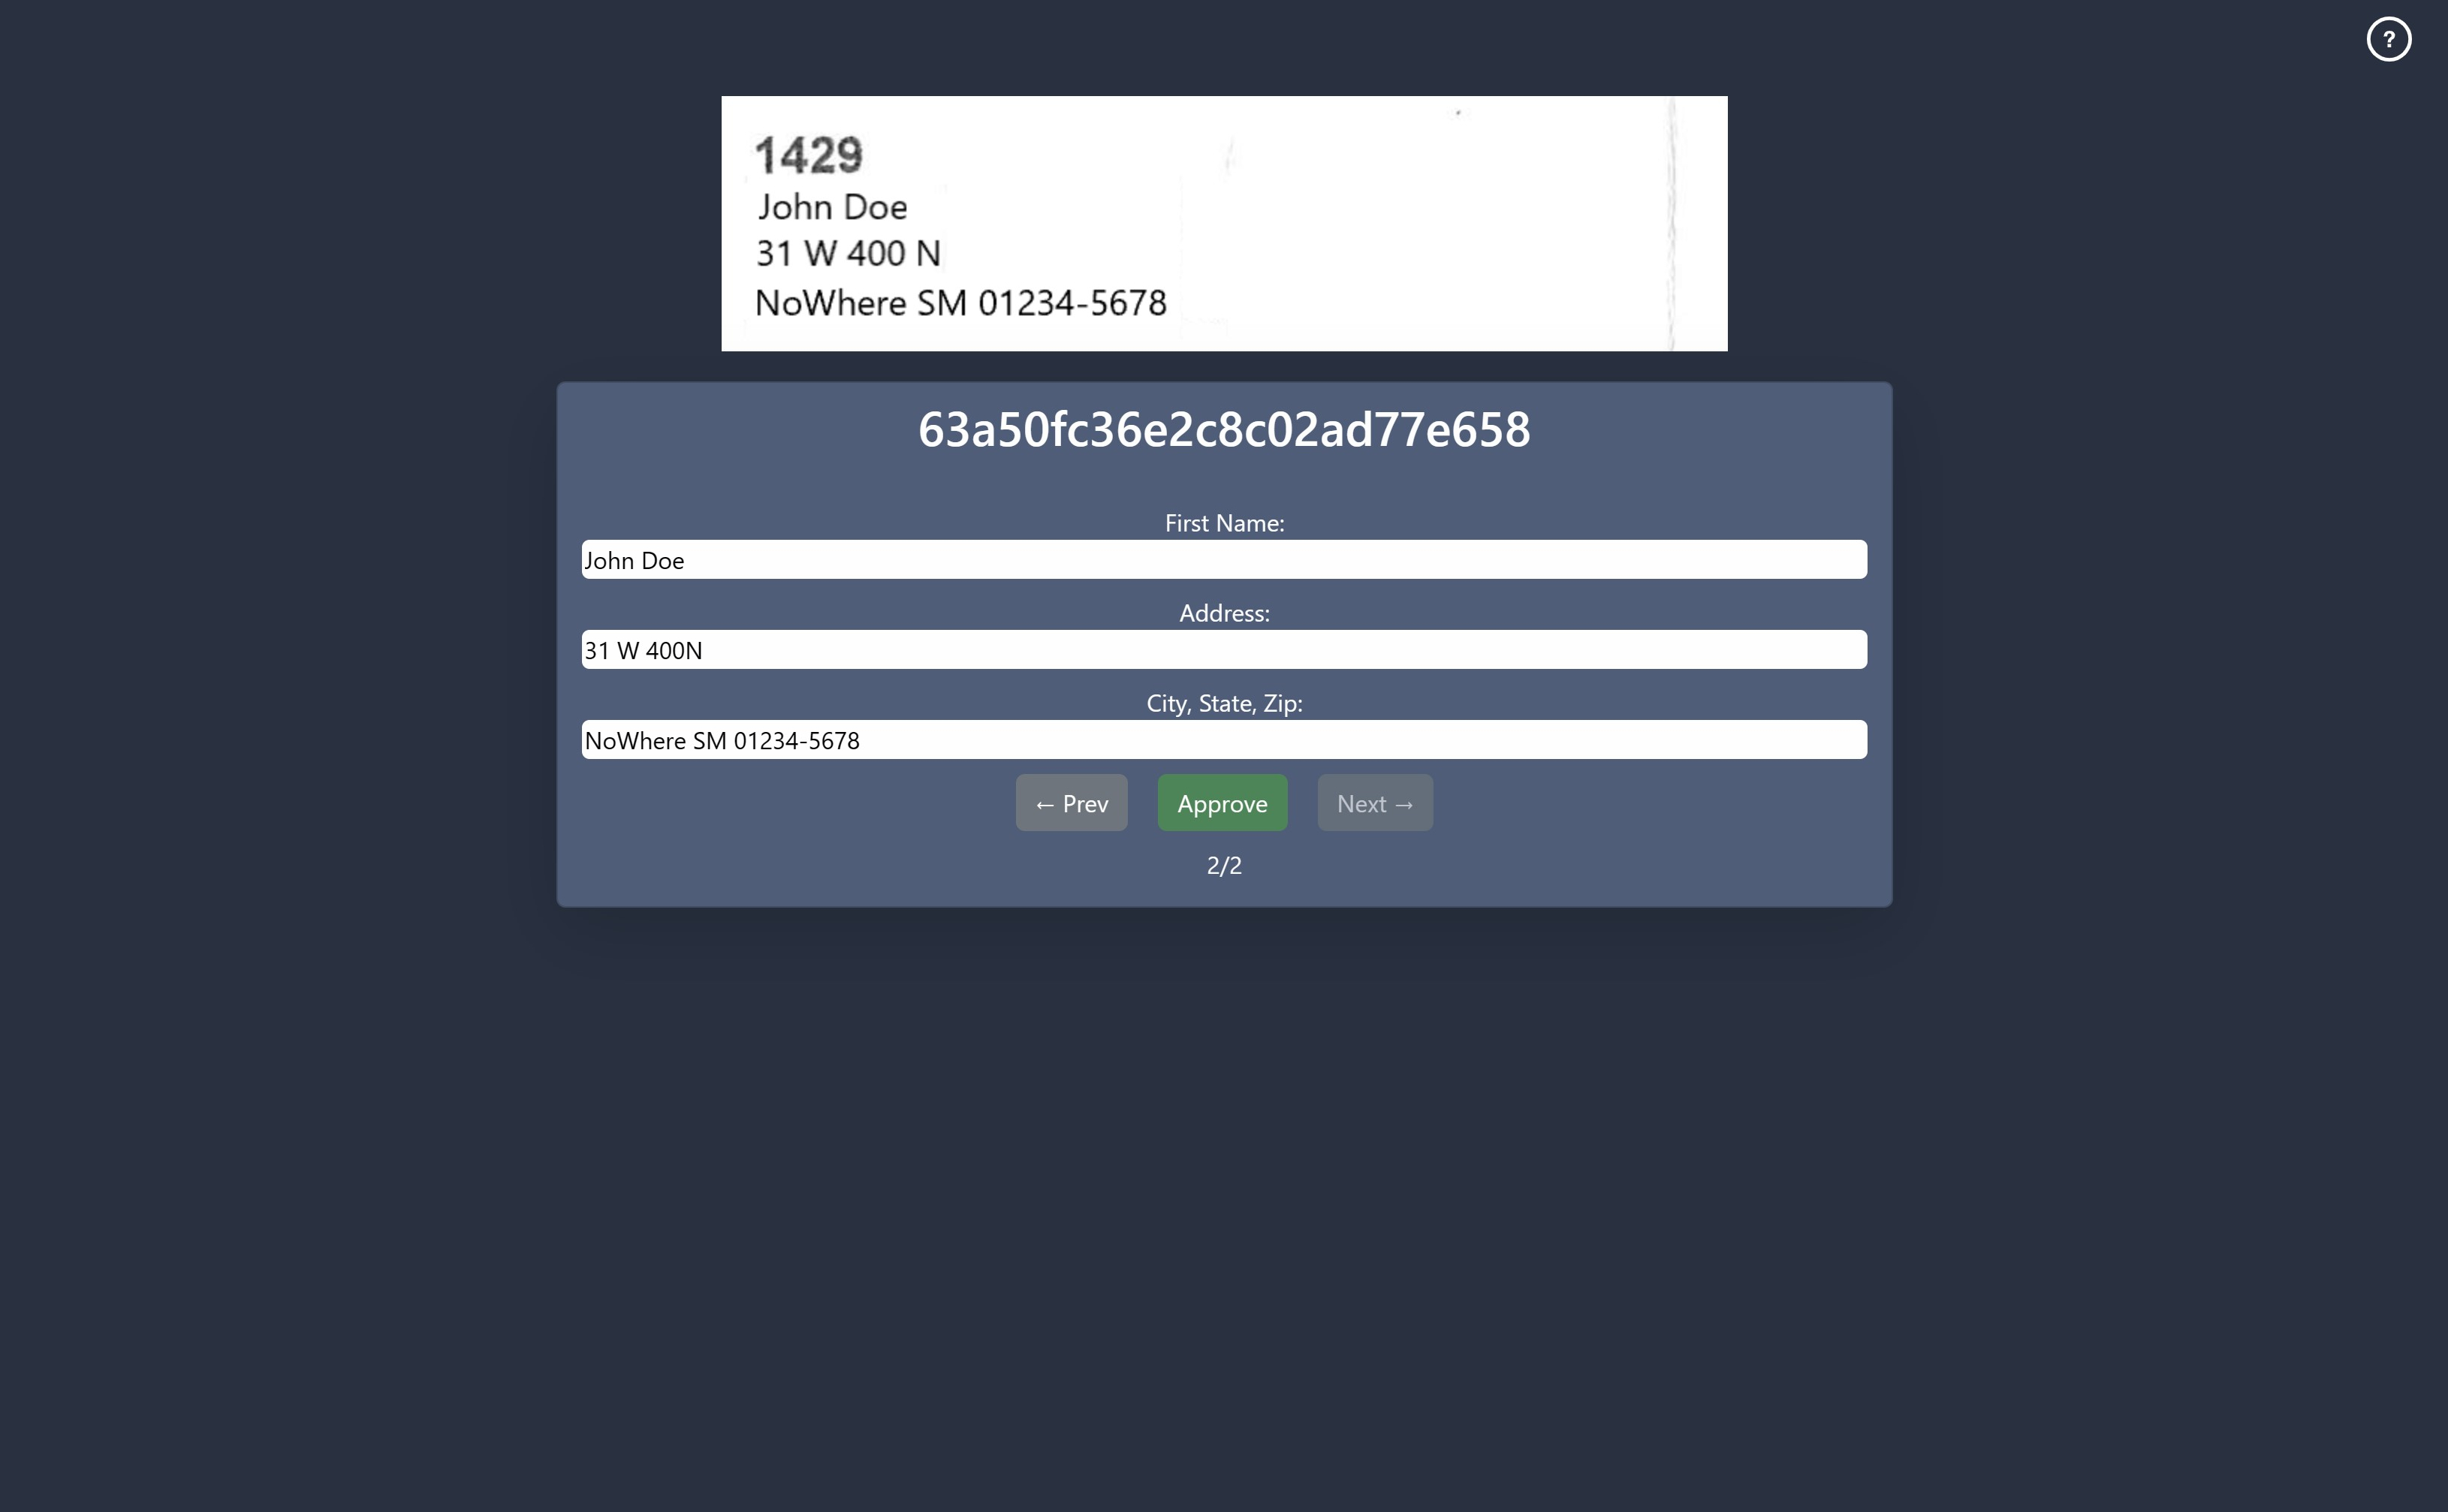
Approval Page for Printed Card
Card Processing
Card processing which was developed by sanfaj01 and myself was a significant portion of the time spent on the web app for a few reasons. The original plan was that the back-end would be written using Node.js along with a few other npm packages. Which was in line with what was being taught within the class. Unfortunately though due to the need to process handwritten text we became reliant on Hugging Face’s python libraries. Which we used to then access a pre-trained model provided by Microsoft. As a result we ended up developing the back-end entirely within Python. Which took longer than expected.
To do this. We used Flask which is a Python Library that allows you to write web application within Python easier. Providing a framework to respond to different http requests. This allowed us to upload the images and PDFs to the python script from the front-end. Which then lead to the use of pymupdf for extracting the images from the PDFs.
Once the images were either uploaded or extracted from the PDFs they would then be initially processed using OpenCV. Which would first sort the cards based on whether they are printed or handwritten cards. Once that was determined processing pipelines split slightly.
For printed cards OpenCV would then be used again to crop the images to be only the part of the card that contains the information we were trying to extract. Once this was done, the cropped image would then be used along side Tesseract to extract the text. Which would then be saved along side the cropped image to a database.
For handwritten cards this was a little different. OpenCV would be used again to crop the images into smaller parts. Except where Tesseract allowed us to feed it a block of text. The Microsoft model required that the images only contain a single line of text. So to achieve this we used OpenCV’s Tesseract integration to locate where certain pieces of printed text where located on the card. Allowing us to more precisely crop the images as needed. Which would result in three separate cropped images. These where then fed into the model provided by Microsoft as a batch. With the resulting text and cropped images then being saved to the database.
Now if we just wanted to save the text we wouldn’t need to bother saving the images most of the time. Or at the very least we wouldn’t need to save them for very long. But we saved the exact images we would feed the model with the idea being to later train a model using the dataset provided by this system. Which we though would allow it to in theory become more accurate in the future. This training feature was never implemented though. But given half the battle with making these kinds of models is having the image and the text linked we figured it would be a worth while venture.
Examples of Cards
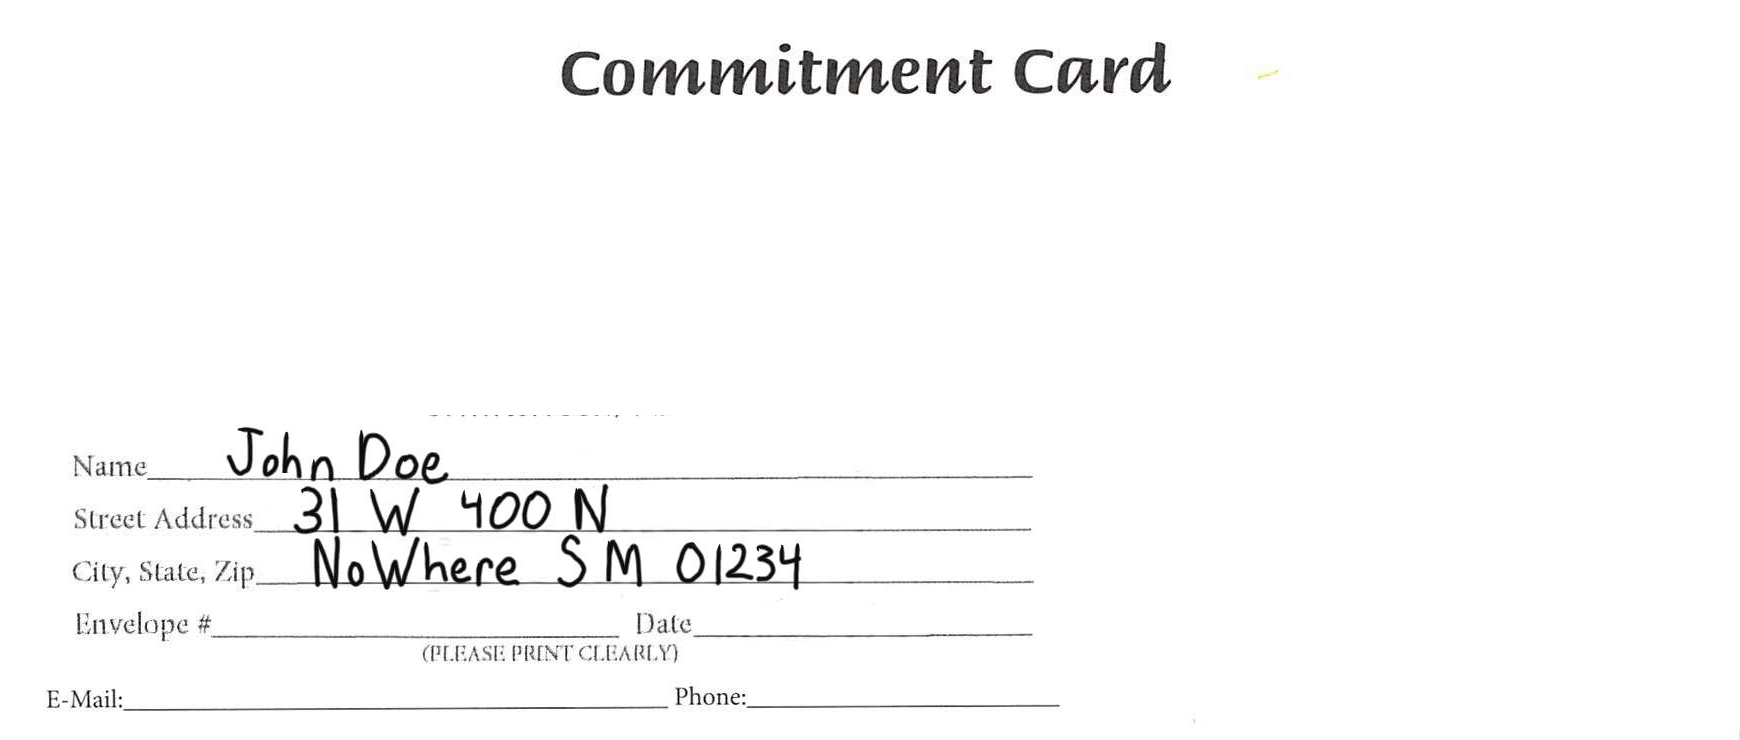
Demo Example of Handwritten Card

Demo Example of Preprinted Card
Database Integration
For Database Integration which was developed by aaron-h-rich and myself also went through some upheaval. Though not as much as compared to the Card Processing.
This integration was done using a Library called Ming which is a python library that provides similar functionality as provided by Mongoose for Javascript. This allowed us to have relational data in a manor similar too how it may be done in an SQL database within MongoDB’s NoSQL design.
With this ability we stored the final text data within a collection. Which then may have other items related to it in 4 other collections which each contained various parts of a cropped image. With one collection being solely for the images cropped from the printed cards and the other three collections containing cropped images of the three lines of handwritten text found on the hand filled cards.
Collection Examples
| _id | Name | Street | City, State, Zip Code |
|---|---|---|---|
| 0 | John Doe | 31 W 400 N | Nowhere SM 01234 |
Collection holding text extracted
| _id | textId(_id of related) | image |
|---|---|---|
| 0 | 0 | Binary Data |
Example of collections holding images
4 of collections of similar structure would be within the database
Issues with Ming
When we started using Ming we found that it was very effective in allowing us to add relations to our data. As well as preforming validation to the data to ensure the correct kind of data was saved in the correct field.
What we did not expect however was the fact that connecting a Ming to a “modern” MongoDB database may have some difficulties.
To farther explain the issue. Found Ming’s issue tracker is an issue it is stating that Ming currently uses an older version of PyMongo. Which is the official python library provided by MongoDB with Ming being an abstraction of it. The issue itself is that version of PyMongo that Ming currently uses is entering a deprecated state and is also missing features added in newer versions. Such as support for mongodb+srv:// connections and the removal of some operations as seen in the issue linked.
And while this may not be an issue for local testing. The default connection methods for MongoDB Atlas use mongodb+srv:// connections.And as a result we had to determine how to connect Ming to Atlas through some trial and error. Until we found that we need to use the connection method listed as “for driver 3.4 or later” within MongoDB Atlas’s dashboard. Once that was found we didn’t have any farther issues.
Unfortunately though this means that in the future we will likely either need to write the project in order to use a different Object Document Mapper or possibly fork and update our own copy of Ming.
This issue would have been avoidable with more research but due to the time constraint of this project this issue was not found until late into the process.
Deployment
Now we had a working version of the project meeting the man requirements for the course. All except deployment which was interesting.
Flask (Back-end)
Due to the computational needs of our project many of the services that provide a free tier for hosting Flask where not options for us. And those that where possible options failed due to some of the python libraries we were using requiring some non-default system libraries to be present.
So for the Flask part of our project I packaged it as a Docker image and deployed it using Google Cloud Run. Which allows you to deploy Docker images which can be spun up on demand based on http requests to a provided url.
The only issue with this was that the final Docker Image exceeded the half gigabyte limit before Google starts to charge money to host it within their servers. As well as the fact that we only had so much “execution time” before we had to pay. Luckily enough I hadn’t redeemed the $300 credit Google Cloud Services offers to new users. So I claimed it and used that to pay for our deployment which we left active the month of our demonstration.
Database
With the issue of getting the back-end hosted then came the need to host a MongoDB database. Which made use of the free tier MongoDB Atlas provides. With the only issues being what I previously described above.
React.js (Front-end)
Finally for our front end deployment the Sponsor of the project provided us a VM that was originally intended to host the entirety of the project. Unfortunately this didn’t end up being the case. But the VM still had NGINX and configured on it with a domain so we made use of it to host our front-end.
The Original Plan
In my local testing I had configured NGINX to preform a reverse proxy. Allowing us to simply have our front-end make requests to a different path rather than a completely different url. Unfortunately again this was not as simple as I had first hoped.
While the VM we where using was running NGINX and we knew where to place our static files for it to serve. We could not locate the config file needed to add in the reverse proxy. And after a few attempts at contacting the sponsor about this it was decided to go with Plan B.
Plan B
Which involved making a “special” compilation of our React.js front-end to make requests to a separate domain. Recompiling our front-end was simple enough so that was manageable. The only issue that cropped up with this was that Flask on it’s own doesn’t have a way of managing CORS (Cross Origin Resource Sharing).
So in the end we had to tack on another library to our back-end that allowed us to do that. With the allowed domains being set as a wild-card due to the short period of time this would be active and available. Realistically it should have been set to the domain we where hosting our front-end on but we just needed to demonstrate that the project was deployable.
Once that was done though the entire project was deployed and ready for the demonstration.
Final Notes
Overall though we produced a reasonable demonstration of how the system could be built and deployed. WIth all four of us coming out of this with more experience than we came in with. Though there are some things I would like to note.
Card Processing Speed
Currently on my local machine which has 16 threads and 16 gigs of ram processing 10 printed cards takes between 6 and 7 seconds. With a pdf containing 1 printed and one hand written card taking 12 to 14 seconds. This apparent speed though did not carry over into our deployment. Which could return us results for the 10 printed cards in around 14 seconds. While taking 27 seconds or longer to return the results for the pdf containing one printed and one handwritten. With these numbers being consistent within a second or two every run as long as the Docker container wasn’t “cold started” which would often add 30 to 60 seconds to the first request.
In an attempt to get some better speeds I adjusted the resources Google Cloud Run would provide the Docker container. Even setting the core count and memory to the max values currently available for preview. And while it did return faster times they where never more than a second or two faster. Making it difficult to determine if it was actually faster or I was just getting lucky in my testing.
One idea I would like to test in the future would be to separate the card processing into a separate Docker container. Allowing you to spin up as many processing containers as needed to possibly process more cards in parallel. It would also reduce the size of the main back-end as well due to it not needing to contain everything. So I plan on experimenting on this later. It also gives me an excuse to possibly mess with Kubernetes and learn more about Docker as well which is a plus.
Accuracy
Our system could handle nearly any of the printed cards we were provided for testing. With the only issue we observed being some 9s being mistaken for 8s due the font and what appeared to be ink bleed. The handwritten cards on the other hand worked at least 50% of the time with no errors. With most of the errors being relatively simple. We were not confident in saving that it should be used though for a few reasons.
One of which being that we could not consistently capture all the lines of text needed. This being due to a combination of factors with one of the largest ones being the fact that the sponsor themselves does not appear to print the cards. With there being variation in the text found on the card that we could ignore. Which required us to tune the system for each major variation we found. And within the cards we where provided there where at least 4. And it was indicated that there would be more due the cards being customized to where they would be available.
It was also possible to cause the system to miss categorize the card as printed when it was handwritten. Especially if the handwritten text was “too far to the left” and encroached on the printed text labeling the line the user would write on.
And while these issues could likely be solved given we had more time. It is unlikely that we will look farther into this in the future due to a few reasons.
Database
Example of Database Viewing Demo
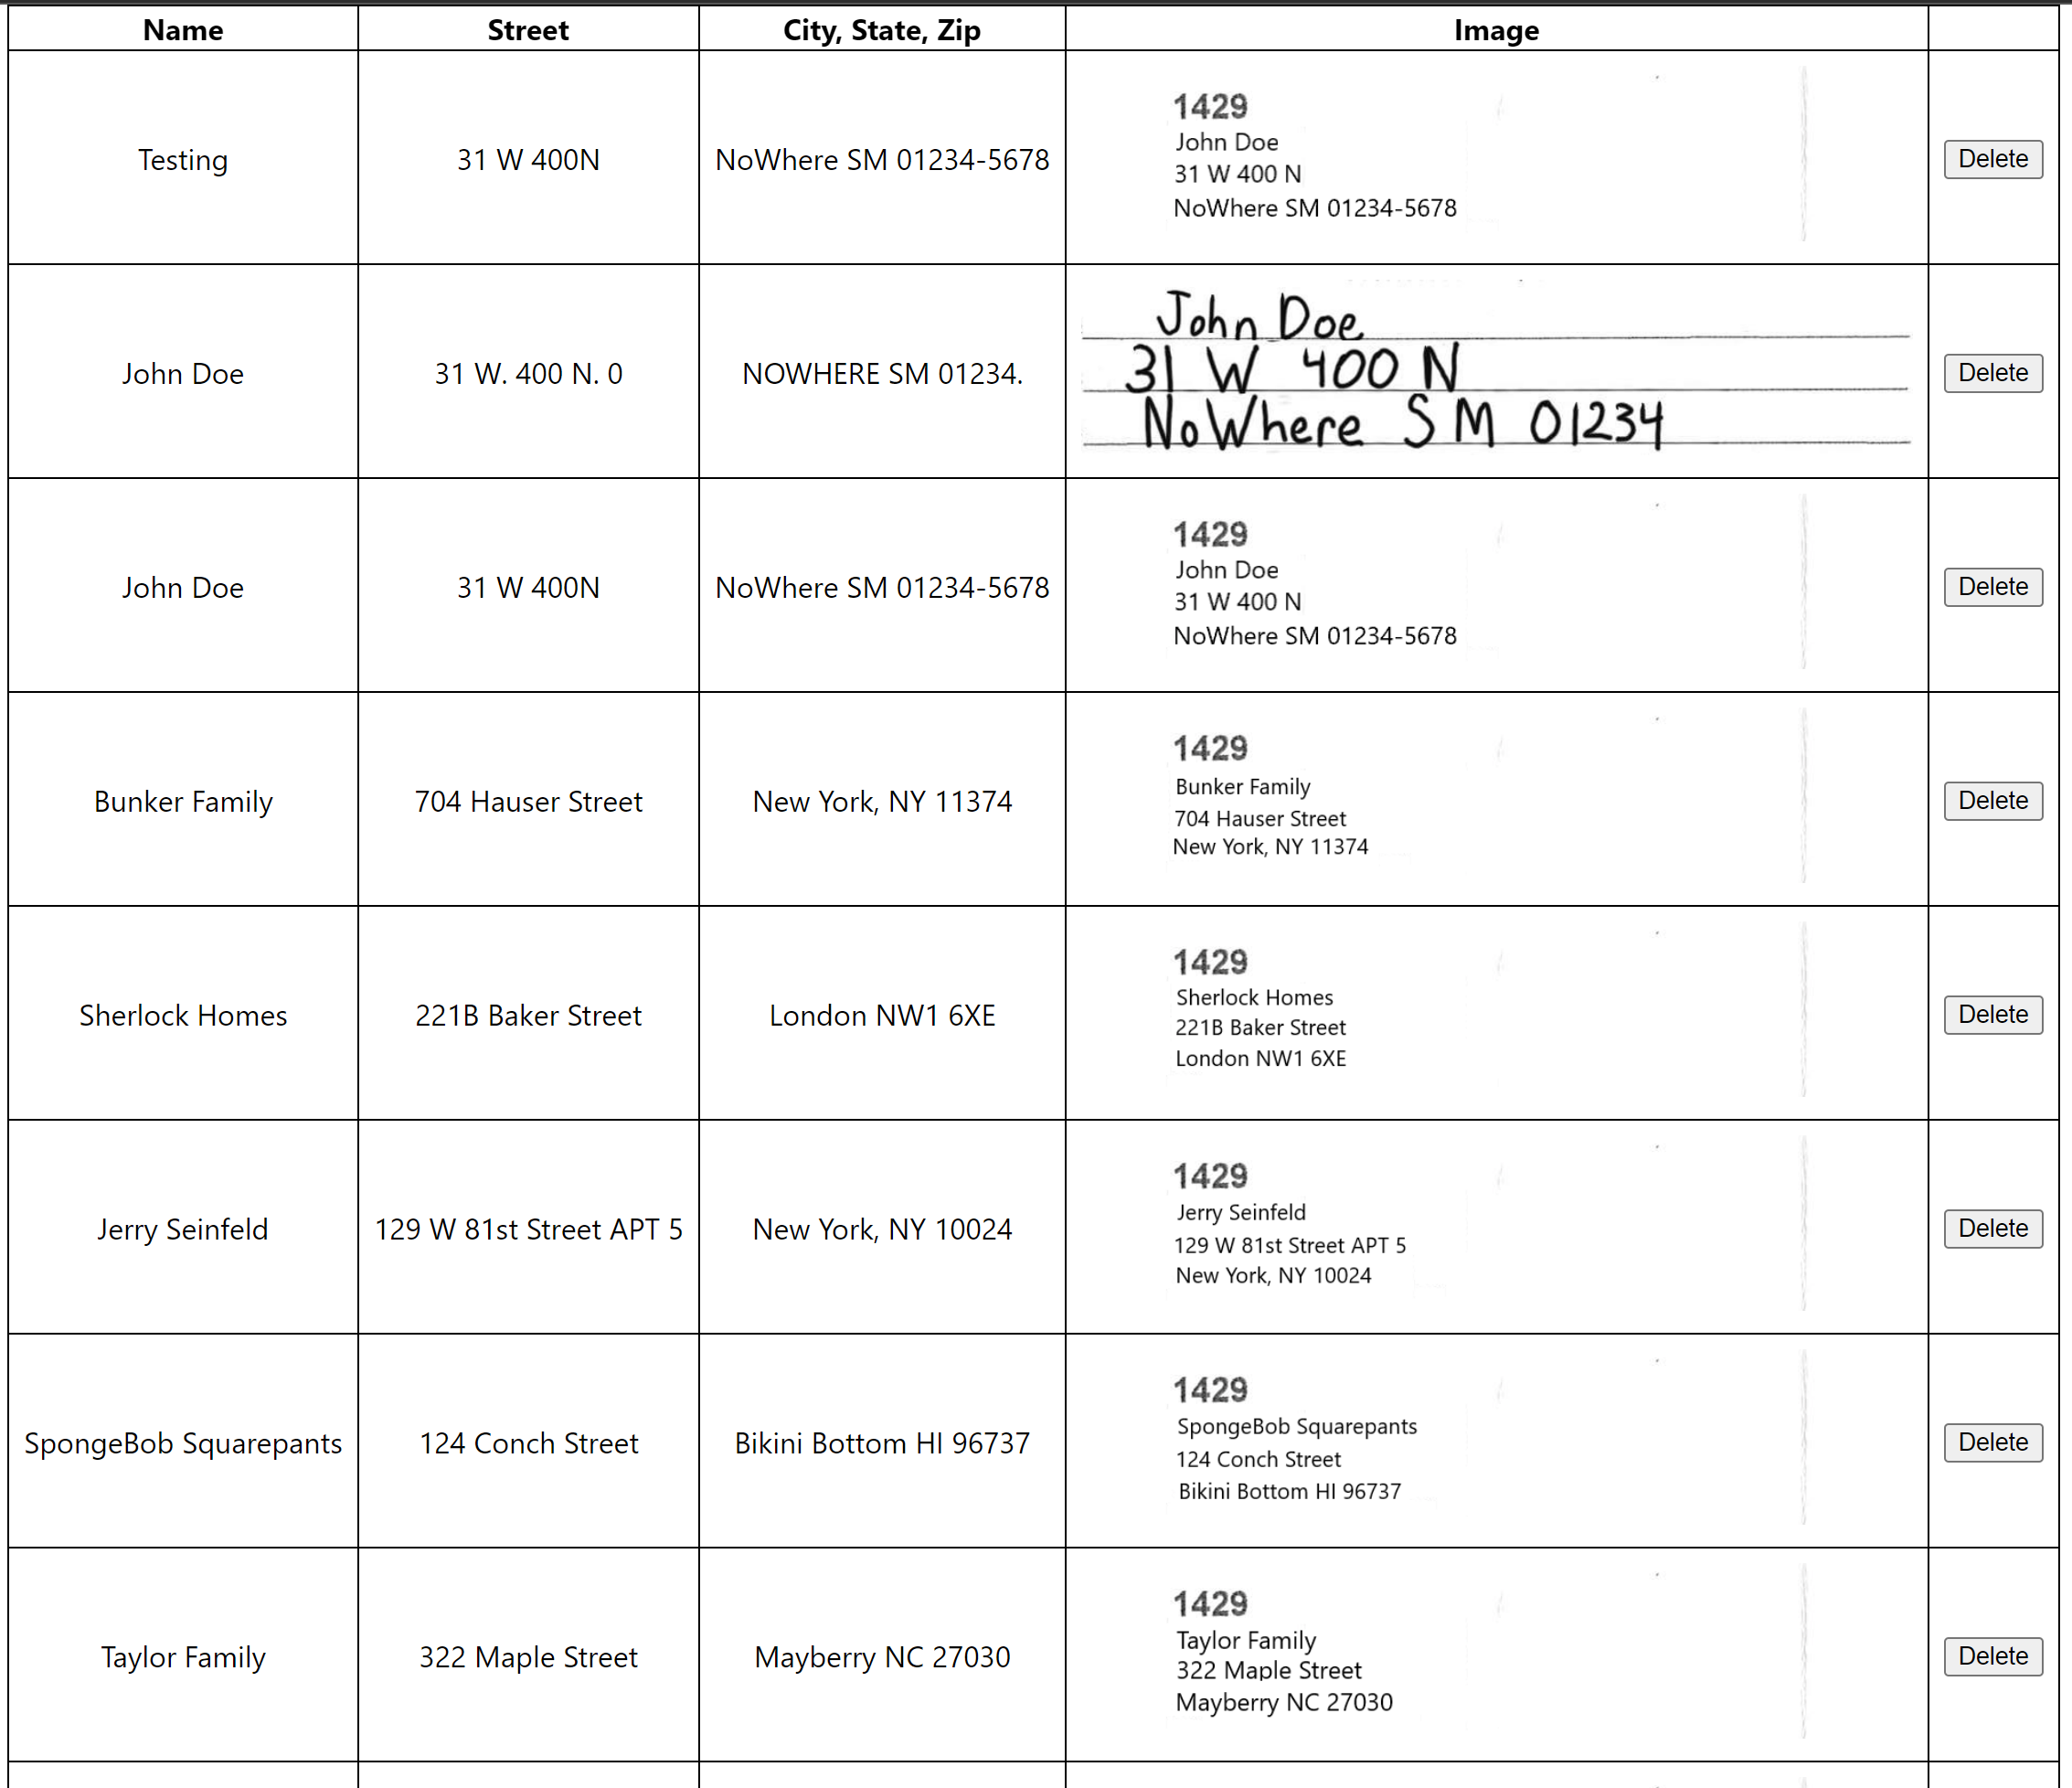
There are also issues with how we ended up using the database. The system currently only preforms a read operation on the database when asking the user to confirm the entry. Otherwise unless you log into the database hosts there is no method of accessing the database contents within the final web app. With the exception being if you use a quick demo that was thrown together in order to ensure that the database did indeed contain the images and was relating them properly. Which can be seen in the image provided. This is something I would like to eventually work in to the “final” web app at a later date.
It is also possible for there to be duplicate text entries. Due to our time constraints we never developed the back-end far enough associate multiple images with a single text entry. As a result each image or set of images for the hand written cards is associated with a single text entry. Causing there to be duplicate text entries. Which I also plan on at least looking into.
Also found within the source code for the back-end is some commented out code that would allow for the system to store the images within an Amazon Web Services S3 Bucket. Which while we tested using LocalStack was never used in deployment. The code ended up being left to allow the sponsor to convert it to use an S3 bucket due to how they currently use Amazon Web Services.
Overall
Overall though with this project I thought it was a interesting learning experience. Not just because of the technologies involved but the team work. Allowing all of those involved to get to know how to use GitHub and Git better. While also determining how tasks could be broken down.
Links
Below is a list of the links available on this page.
-
Libraries
-
Hosting And Deployment
-
Other Technologies
-
Team Member GitHubs